Showing posts with label Clean Eating. Show all posts

Thursday, November 23, 2017

Paleo Nachos


Every time I hear the word 'nacho' I can hear my little sister saying 'NACHOOOO' (like Nacho Libre). *Sigh* the small things that entertain me. 

Anyway, as I've mentioned before, I crave a lot of foods since being Paleo. When I say I was addicted to breads and sugar, I mean I was ADDICTED! So anything that can trick my taste buds into thinking I am getting the same 'bread' and 'sugar' I grew up eating without the preservatives and additives, I'm game for. 

My mother-in-law knows my struggle is real and found these grain-free tortilla chips for me to try. Obviously I immediately fell in love! Siete Foods also has grain-free tortillas! Double score. So that sparked the nacho idea. 

We used taco meat that was leftover from Taco Tuesday (yes, we do have it EVERY Tuesday). All of our meat is grass-fed beef, sometimes mixed with deer or elk Ty's shot. We don't use a typical taco seasoning, we've made our own consisting of chili powder, onion powder, garlic powder, oregano, paprika, and cumin. 

I had some left over greek yogurt (this is controversial for paleo eaters, and it just depends on the person) so I decided to add it on for the protein. If you are looking for a greek yogurt, I suggest Fage.

taco meat
Siete tortilla chips
goat cheese
Fage greek yogurt
fresh salsa
guacamole


Cover the skillet (we used this one) with Siete tortilla chips. Add taco meat, previously warmed, and goat cheese. Place in oven at 325 for 5 minutes (we went too long at 8 minutes) or until tortilla chips are warmed and cheese is slightly melted. Add greek yogurt, salsa and guacamole as desired.


Careful when taking the skillet out of the oven - those suckers hold heat like no other so use an oven mitt! 


Enjoy! 

XOXO
The Lands


Tuesday, August 29, 2017

Health and Strength

Six months ago I never would have guessed my body was in as bad of shape as it really was. I thought I was the healthiest I've ever been. I was working with a trainer for months prior, counting macros and finally achieving what I wanted when it came to body image. After visiting with my holistic healer, I learned body image is only the outside and someone can be severely messed up on the inside. Since then, I've been on the road to recovery to try to change my body in a better way.


I've been asked numerous times 'do you feel any better?' - and YES I do!

I know the holistic approach is a little different from the typical doctor visit and 'healthy' guidelines, but it was something I felt comfortable with and wanted to try before succumbing to the modern medicinal approach.

I've gone back to my holistic healer three times in the past months. My face is clearing up and eating healthy is no longer a burden but a way of life for me. I've had a few cheats and all they did was make me sick. So that's nice (insert eye roll here). I moved on from Lori (the holistic healer) to a foot zoner. That's a whole other issue but she's been able to tell me things that are going on in my body and a solution.

Sometimes issues aren't always physical, but emotional. In working with the foot zoner, we've discovered there are emotional issues that can block fertility rather than physical imperfections internally. Over the past month I've been able to slowly work through the emotions and find peace in where I am at this point in life. I'm a firm believer the Lord works in mysterious ways. Our plan of life has no timeline and if things aren't meant to be, they just aren't meant to be. BUT I have faith that one day, Ty and I will become parents. Whether it be biological or adoptive, we will be blessed with children in our family.


Andrea

Thursday, June 11, 2015

Paleo Fruit Popsicles

Summer hit hard here in Utah. So hard, that I had a rough time adjusting without my daily popsicles. (Yes, I'm secretly 5.) Anyways, Tyson pulled this AMAZING recipe out of thin air (magician, I know) and it definitely hit the spot! Plus, it's made with REAL fruit, and I KNOW there isn't any added high fructose corn syrup, stevia, sugar, etc. 

6-8 servings

1 can full fat coconut milk (no sugar added)
1 cup berries (We used frozen, but fresh would probably be more flavorful)
1 ripe banana


Blend together. Disperse evenly into popsicle molds. Freeze for at least 5 hours or until completely frozen. 

If you have a real sweet tooth, you can add in 1 or 2 tablespoons of raw honey or organic maple syrup.


You better believe I will be eating these all summer long! 

Enjoy! 

XOXO


post signature

Saturday, May 16, 2015

Kayla Itsines Update Week 16

I decided to do this update a bit differently. Why? Because I already ate my Cold Stone and feel like there is a large possibility I am going to be doubled over soon, and if I showed you my 'progress pic' you would probably think it was some type of pregnancy announcement. 

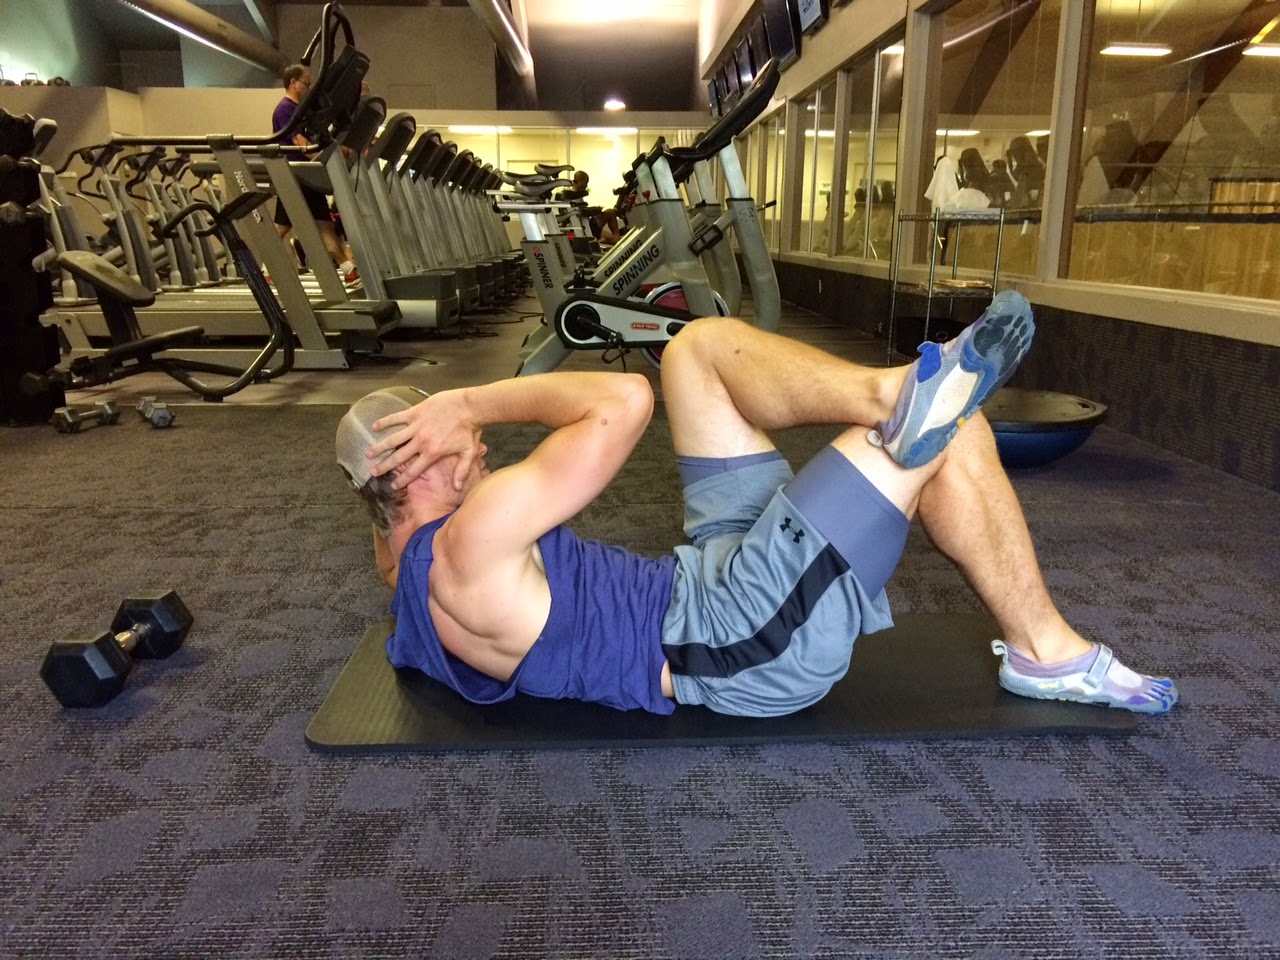
Instead, we took some photos of the ab exercises from today in order to give you a quick workout at home. 


Weighted Jack-knife situps: 20 reps


Side-crunches on back: 30 each side 


Weighted Toe-touch: 20 reps


Weighted straight sit-up: 20 reps


Also, here are some tips and tricks from Ty. 


It is very much a body weight exercise routine, but that doesn't mean it can't kick your butt. The first time I looked at this exercise I thought it wasn't great for guys; this is mostly for girls who want to be lean and toned. That is how Kayla has advertised and marketed her product. But for all the fellas out there, you can gear it more towards men. You can follow everything and get more fit and in better shape, but here are some things I have done to make it geared more for guys. 

1. ADD MORE WEIGHT. There are weights in some of the moves, just add more weight so that finishing the exercise move is extremely difficult.

2. JUST ADD WEIGHT. If there is a body weight exercise that isn't that hard for you add weight. Example is the step ups on leg days; in her book she doesn't use weight. Make it a real difficult move by adding heavy dumbbells in each hand. 

3. DO MORE. If you get through something really easy, do more before proceeding. Example is push ups on arm days; she only has 15 in the reps. Why not trying to do 30-40 and really get a burn going? You can also mix your push up style. Ever tried finger push ups? 

4. CHANGE ONE OF THE MOVES. If you don't feel like 1 or 2 of the 8 exercise moves in each routine is helping you work towards your goals, then change the move to something else. Example: There is a move on arm days that is a squat and curl move. It works my legs more than my biceps, so i just do bicep curls instead. 

Like I said, if you follow her program you can get fit, lean, and strong, but you can change it to fit your needs. I am not going to say your going to look like Arnold Schwarzenegger during his glory days, but you can tone up and increase your physical performance. 

Ty


post signature

Tuesday, May 5, 2015

Kayla Itsines - Week 15 update

For the past few weeks, I've been sick so it took me 2 weeks to finish a week on the workout plan. I think it's important to allow your body to heal when your sick. It was also my birthday last week which meant a lot of celebrating. I broke my diet more than normal, but still didn't go crazy. My body gets sick when I eat something I'm not supposed to like bread, or tortillas. So, most of my cheating was with sugar. It's OK to cheat every once in a while (on your diet, not your spouse). You can easily get back on track at the next meal. This update is to show a few things. One, my progress. And two, that lighting and posing can play such a huge part in pictures as well as the time of day the photo is taken. These are taken right when I woke up. This is when I've found my body to be the most lean. Through out the day, I tend to puff up a bit due to all the food and water intake. The second set of photos were taken right after I ate at 1 pm.

AM photos:


Stretching my stomach by taking a deep breath in, I can make my stomach muscles appear longer than they really are. This is something I see ON THE DAILY on social media. It drives me nuts. Some people may look like this in real life, and in my opinion, that's fantastic! I'm jealous! I'm not calling anyone out, or claiming no one looks great in real life and everyone is photoshopped, but too often we compare ourselves to the perfect image of someone else. 


This is post-meal around 1. Abs are not as defined as before, and my body begins to appear more bulky than lean. 


The reason for this post is so everyone that is working toward a goal doesn't get discouraged. Don't look at photos on social media and mistake them for raw images. Majority of those photos are photoshopped, or have been taken in the right lighting or during the right time of day to make the person appear fit. Continue working your way to achieving the goal you have in mind for YOU. No one can tell you the right way to look. As long as you are happy, that's all that matters. 


post signature

Monday, April 20, 2015

Ultimate Taco Meat

Eating paleo can get BORING. So, my sweet husband does his best to switch things up, trying out new recipes to make sure I'm not eating the same stuff, day after day.


This recipe is out of the Frugal Paleo Cookbook we received for Christmas. (It's a good one to have on hand and can purchase it HERE)

The Ultimate Taco Meat 


Serves 2 - 4 (In our case, its more like two - we eat a lot)


INGREDIENTS:
2-3 TBSP bacon grease or coconut oil
1 cup diced onion
1 cup diced zucchini
1 cup chopped bell pepper
1/2 cup diced carrots
2 cups chopped kale
1 tsp sea salt
1 lb grass-fed ground beef
3 cloves garlic, minced
1 batch Taco Seasoning Blend (posted below)


{Preheat} large skillet to medium heat and melt your desired fat.

{Add} Onion, zucchini, bell pepper, carrots and kale to the hot pan along with the sea salt. Cook and stir until the veggies are almost tender - about 7-9 minutes. {Dump} par-cooked veggies into a large bowl and set aside.

{Return and add} additional tablespoon of fat to the pan if the other has dried out. When the pan is back up to medium heat, cook the ground beef, garlic and Taco Seasoning Blend until the beef is browned - approximately 10-12 minutes.

When the ground beef is nearly done, return the par-cooked veggies to the pan and continue to cook together for another 5 minutes or until the veggies are fully cooked.

{Serve} immediately, or pack away for up to 5 days.


Taco Seasoning Blend:

1/2 tsp ground cumin
1/2 tsp ground coriander
1/2 tsp onion powder
1 tsp garlic powder
1/2 tsp chili powder

In a small bowl, combine all ingredients and mix well.


We've added our meat to salad or you can eat it alone. Either way, it's a great way to get your veggies and protein in a quick meal.

Ranch Dressing recipe can be found HERE


ENJOY!


post signature

Thursday, March 12, 2015

Ranch Dressing

Life has definitely gotten the best of me this past few weeks and I'm just getting around to posting the Paleo Ranch Dressing recipe.

Ingredients:

1 cup Paleo Mayo (Find recipe here)
1 cup canned coconut milk (full fat)
1 TBSP dill weed (dried)
1/2 tsp garlic powder
1 tsp apple cider vinegar
1/4 tsp salt
1/4 tsp pepper

*Side note on the coconut milk: canned coconut milk separates - with a hand blender, blend the contents of the canned coconut milk back together prior to adding

Instructions:

Combine all ingredients in a bowl and mix.

Ranch will last approximately 1.5 weeks in refrigerator


post signature

Saturday, March 7, 2015

Kayla Itsines update - week 7


I cannot believe we just finished week 7 from the BBG! I know ya'll are wondering, and yes, my husband looks great in his bikini thanks to this. HAHA. JK.

Seriously, I have seen such a difference! I hate to admit it, but I think I'm actually addicted. I look forward to going to the gym, sweating, and getting that sense of satisfaction that I did something that day. I've seen a lot of lifting in my buttocks area, my quads are beginning to tone, and my abs... are even there when I eat ice cream for a cheat treat!

I wanted to give everyone an update on the challenge, but also to address a few questions I have received through txt and email.

The Kayla Itsines BBG is designed for anyone and everyone that is looking to improve their body, and athletic performance. However, when you begin the workout, your not going to be completing the entire workout three times over. The way the BBG is designed is like interval training. I'm sure you all have heard of HIIT *High Intensity Interval Training*. It's proven to be one of the most effective ways to lose weight AND tone the body without spending hours at the gym.

So, the BBG runs in intervals. 4 rounds, 7 minutes each, with 30 second breaks in-between each round, bringing your total workout to 30 minutes. During each round, there are 4 exercises with a limited number of times you do each exercise. Once you finish the specific number of each exercise, you move on to the next one.

As I mentioned above, everyone will be on different levels. Some people take the 7 minutes to go through one round one time, while others may be able to finish it one and a half times. The key here is to challenge and push yourself, but also focus on your form. Push yourself to your limits, but if you begin to feel faint or like throwing up, back off just a bit.

For example, one round may look similar to this: 24 walking lunges, 15 burpees, 15 tuck jumps, and 40 bicycles. Once you finished the 24 walking lunges (whether it takes you 1 minute, or 4) you just move on to the next one, the burpees. Once you reach the end of the line-up, simply start over until your timer goes off. Hopefully that makes sense.

Here are a few moves we shot while at the gym this morning just to make sure your doing the correct form.

Mountain Climbers: 


That counts as one. Try doing 25 in a row to engage those abs. 

 Elevated Sit Ups:


There's one. Try doing 15. 

Weighted bent-leg jackknifes:


15 reps

Leg lifts:


15 reps

I hope this clarifies a few things, and helps motive a few of you that don't have the Kayla workout right now. Use these 4 moves to create your own interval! 


post signature

Thursday, February 26, 2015

Vanilla Bean Dream

It's no secret, we're LDS. That means we don't drink coffee or tea. One time, like 10 years ago, my cheer team was headed back from Nationals in California. While waiting in the airport, a few of us went wandering and found this amazingly tasty drink from Starbucks that doesn't have coffee. Now, I know a lot of people are thinking, how can you go to Starbucks and not get coffee? Did you read the first sentence? I'm Mormon! Anyways, I really just wanted a tasty drink and wasn't in the mood for fruity. So, I tried out the Vanilla Bean Frappuccino. Holy cow. That was the tastiest vanilla shake/malt/drink (because really, what is it?) I've ever tasted! So whenever we end up in an airport and I have an extra $10 to spend (which is never, I'm poor, remember?) I like to get the Vanilla Bean Creme Frap.

Fast forward a few years. And remember, now I'm paleo AND addicted to treats.

My husband walks upstairs with this vanilla drink thingy and naturally, I'm like, Hey, give me some of that. I take a sip and bam. Sorry charley, this is mine now! Needless to say he had to make another one for himself (poor guy). But anyways, my point is, he had pinpointed this frappuccino thing without me even telling him! Oh my heavenly goodness.

So, today as I was lashing a friend and fellow reader, I mentioned I would share this AMAZING recipe with you all.

Vanilla Bean Dream:

2 scoops Gnarly Vicious Vanilla protein
1 cup crushed ice
1 cup water
1/4 tsp cinnamon

(Adjust the ice and water ratio to make a thicker consistency)
More ice = thicker

Blend in compact blender and serve immediately.

Plus, it only has 2 grams of sugar in this baby vs the 57 in the starbucks version!

Terrible picture, but you get it, right?


XOXO
post signature

Tuesday, February 24, 2015

Snack Time!

It's no secret I'm a big fan of snacking. I can't go an hour without eating something, unless I'm working or sleeping. That being said, I decided to write down a few snacks I love that are not only satisfying, but they're also paleo approved.

Frozen Fruit and Coconut Milk

This is probably one of my all-time favorite snacks.


(Don't judge my photo, the struggle is real)


Frozen Fruit: Raspberries, Blueberries, Blackberries (Costco)
Canned Coconut Milk (Whole Foods)
Cinnamon

Simply pour the canned coconut milk over the frozen berries and top with cinnamon. We like to get our coconut milk from Whole Foods because they give you a discount if you buy by the case - which we always do. It's important you look at the ingredient list. This is primarily why we purchase the canned vs the bottles or jug milk, there isn't any added sugar. With all canned milks, you will want to make sure your refrigerate the remaining substance, and stir the liquid before use.

Homemade Ice Cream

We bought a Yonanas machine from Bed Bath and Beyond about 3 years ago and have loved using it! We like to make different flavor ice cream that we know is completely healthy, and what ingredients are used.


The main ingredient in the ice cream made with Yonanas is... bananas. It gives ice cream the creamy consistency, while added ingredients change the taste of the treat. We've tried a lot of different combinations, but as long as it will go in the processor, it will work fine.

Strawberry Banana Ice Cream: 2 servings
4 frozen, peeled bananas (peel before freezing)
8-10 Fresh Strawberries

Starting with bananas, alternate bananas and strawberries into the processor. Serve immediately.

Apples and Almond Butter

1 apple
Almond Butter (no added oils or ingredients)

Slice apple, spread almond butter on half of the apple (Duh).


There are also a few things I like to just snack on that are already made.


Dried Plantains (Harmons)

Chips and Salsa (Dried Plantains and Salsa, both from Harmons)

Raw Veggies and Ranch (homemade via mayo)

Celery and Almond Butter

Larabars

Bell Peppers

Greek Salad (Cucumber, Tomato, Kalamata Olives (Costco) and Feta Cheese (Costco))


Hopefully this will give you a few ideas and help with on-the-go snacks, cravings and things to eat between meals!


Ranch Recipe coming soon!


XOXO
post signature

Thursday, February 19, 2015

Paleo Mayo (hey that almost rhymes)

Before I start, I just want to throw out a quick disclaimer. I've been posting a lot about our Paleo Lifestyle and I just wanted to say that this lifestyle does not work for everyone. Just like everyone else in the world, we have flaws, and we aren't perfect. We strive to do our best and to use the best products available. In no way do we claim any of these recipes or workouts to be our own and would like to fully credit the appropriate authors.

Paleo is something that works for us. We do not believe in evolution (even though The Primal Blueprint insists on it), rather we believe in Christ. We are two LDS people that like to improve our lives and treat our bodies as a temple, keeping it clean inside and out.

Thanks


Paleo Mayo


Eating paleo may seem like a bit of work. You have to prepare everything from scratch and nothing comes from a box or a carton. But, we've found it to be something that is doable, and is part of our lifestyle. We make the time to prepare the food, whether it be Mayonnaise, or a birthday cake, its all from scratch the Paleo way. 

Ingredients: 

2 Whole Eggs (Room temperature)
2 Tablespoons White Vinegar or Lemon Juice (1:1 mixture of the two works as well)
1/2 Teaspoon Salt
1/2 Teaspoon Mustard (Optional)
1 1/2 cup Light Olive oil 
1/4 Teaspoon Pepper (Optional)


First, combine eggs, vinegar/lemon juice, salt, mustard, and pepper in the mixing container. Gently pour olive oil over the top (this part is important). 


Next, insert the hand blender into the mixture, all the way to the bottom, trying to pin the egg yolks against the bottom. 


Turn the blender on, leaving it on the bottom. You will start to feel the egg yolks break up and essentially thicken the mixture, about 10 seconds. Then, slowly raise the hand blender towards the top and ensure the mixture is entirely blended. 


The End. 


Easy huh! There are other oils you can use such as: 

avocado oil
walnut oil
macadamia nut oil (For the rich :))

But, oils you would like to stay away from are: 

soybean oil
canola oil
vegetable oil 
corn oil 
peanut oil
sunflower oil
safflower oil
cottonseed oil
grapeseed oil


The above oils are not a part of the paleo diet and essentially bad for your health. It is essential you use LIGHT olive oil and not EVOO because EVOO is too strong and will taste... nasty. 


We like to use this little baby. It's only $35 and can be ordered HERE

Hope this information helps! I know its hard to make smaller things like this, but your body will thank you in the long run! 


XOXO
post signature